

How to Identify Frozen Pipes: 7 Warning Signs

Table of Contents
Signs of Frozen Pipes You Should Never Ignore
Weak Water Flow and Strange Plumbing Noises
Damp Drywall, Ceiling Rings, and Unusual Odors
How to Identify Frozen Pipes by Locating the Frozen Section
A Visual Inspection Checklist for Non-Plumbers
Common Locations Where Pipes Freeze
How to Thaw Frozen Pipes Safely Without Causing a Burst
First, Confirm What Is Actually Frozen
Thaw From the Faucet Back
Tools That Work and Tools That Cause Damage
Watch Pressure and Flow While You Thaw
What to Do If Water Returns but Something Feels Wrong
When to Stop and Call a Professional
PEX vs. Copper vs. PVC: How Pipe Material Changes the Risk
Why Copper Is the Highest-Risk Material
PEX Survives More Often, But Not Always
PVC and CPVC Crack at the Joints
A Quick Material Check Before You Thaw
Where Smart Sensors Fit In
When to Call a Professional Plumber
Preventing Frozen Pipes in Winter
Smart Home Leak Detection and Heat Tape
Documenting Damage for Insurance Claims
Frequently Asked Questions
Last Updated: October 2, 2026
Signs of Frozen Pipes You Should Never Ignore
Identifying frozen pipes starts with listening: the first clue usually isn't a burst pipe, but a faucet that slows to a trickle or a new sound in your walls.
Weak Water Flow and Strange Plumbing Noises
A drop in water pressure is the earliest warning: a weak stream caused by a frozen section restricting the line.
Listen for odd sounds too:
Clanking inside walls or under floors
Whistling from a faucet that used to run quiet
Gurgling when nothing is draining nearby
Damp Drywall, Ceiling Rings, and Unusual Odors
Water damage hides well. Look for damp drywall that feels soft or cool, and ceiling rings, faint circular stains where water pooled above.
How to Identify Frozen Pipes by Locating the Frozen Section
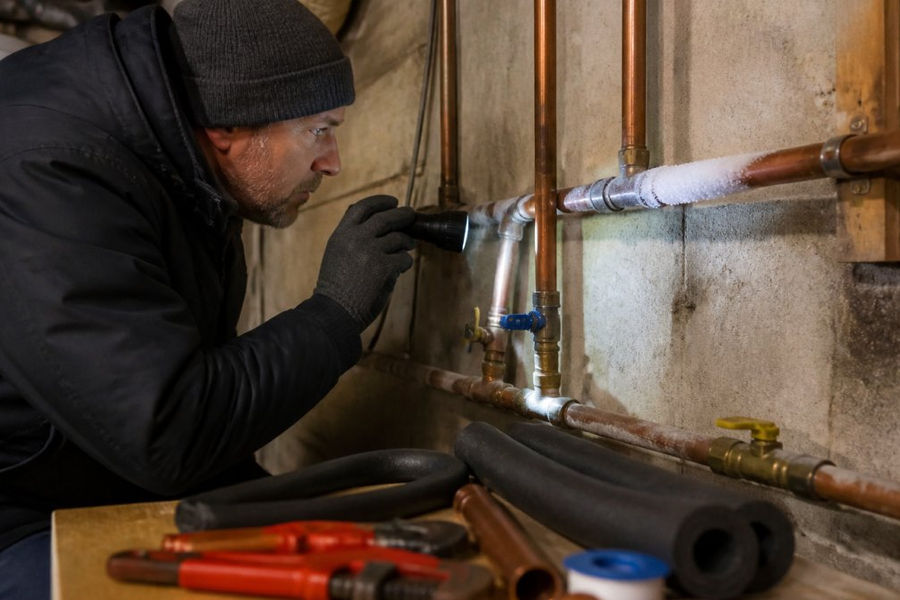
Start where the cold hits hardest: follow the water supply lines from where they enter your home toward the fixtures that lost pressure.
A Visual Inspection Checklist for Non-Plumbers
You don't need to be a plumber to spot a freeze. Use this checklist:
Check pipes along exterior walls first
Look in the crawl space and basement
Inspect pipes under sinks on outside walls
Feel for cold spots, frost, or condensation
Check the main shut-off valve area
Look behind the washing machine and water heater
Common Locations Where Pipes Freeze
Some spots freeze far more often than others:
Unheated areas like garages, attics, and crawl spaces
Pipes running through pipe joists near exterior walls
Outdoor spigots and hose bibs
Supply lines to a kitchen or bathroom on an outer wall
A quick temperature drop makes all of these worse. Cold air sneaks into gaps and hits the pipe directly.
How to Thaw Frozen Pipes Safely Without Causing a Burst
Thawing is where a manageable freeze becomes a flood. Melt ice evenly, from the open faucet back toward the blockage, so pressure never builds behind a still-frozen section.
KHOU 11
First, Confirm What Is Actually Frozen
Before you apply any heat, narrow down the problem:
Open the cold and hot taps at the affected fixture. Cold runs but hot doesn't? The hot supply line is frozen. Neither runs? The blockage is likely on the shared supply or the main.
Check other fixtures on the same wall. One affected means a local freeze; several dead means the freeze is closer to where the line enters the home.
Locate the main shut-off valve and confirm it turns freely.
Feel along the suspect pipe for a section noticeably colder than the rest, or showing frost or condensation.
A frozen but unsplit pipe feels hard and cold with no give. A split pipe may show a bulge, crack, or damp insulation.
Thaw From the Faucet Back
Open the faucet first so melting water has somewhere to go, then work heat from the end closest to the tap back toward the blockage, keeping melted water flowing out instead of trapping pressure between the ice and a closed valve. Work in short passes: heat a section, wait, feel for movement, then move on.
Tools That Work and Tools That Cause Damage
Safe options:
A hair dryer on low, moved constantly, never held in one spot
Heat tape rated for the pipe material (metal-rated vs. plastic-rated)
A space heater aimed at the section, never left alone and never placed against the pipe
Warm (not boiling) towels wrapped around the pipe as a slow, even heat source
Never use an open flame, blowtorch, charcoal heater, or heat gun on its highest setting, sudden heat causes thermal expansion, which cracks pipes. Plastic pipe (PEX, PVC, CPVC) is especially vulnerable to high-temp heat guns, which can deform the pipe wall even without a flame.
Watch Out Never pour boiling water directly on a frozen pipe or use a propane torch. The shock of sudden heat can split the pipe, turning a thaw into a burst and a flooded room. Boiling water on a vertical run can also run down and scald you when it hits a fitting.
Watch Pressure and Flow While You Thaw
Keep the faucet open and watch the stream:
A weak, sputtering stream means ice is still melting and air is working out of the line.
A sudden strong flow followed by a drop can mean a split opened up. Shut the main off and inspect.
No change after 20-30 minutes of gentle heat means you're heating the wrong section, or the blockage is farther back than you thought.
If a pressure gauge climbs while the faucet is open, that signals a blockage downstream. Stop and call.
What to Do If Water Returns but Something Feels Wrong
Water coming back is not the finish line. After the line is flowing:
Leave the faucet at a trickle for 15-20 minutes to flush remaining ice and debris.
Check the exposed pipe and nearby joints with a dry paper towel for moisture.
Look at the ceiling and wall below the pipe for new stains over the next 24 hours.
If you have a smart leak sensor, confirm it still reads dry.
When to Stop and Call a Professional
Stop thawing and call a licensed plumber if:
You cannot find the frozen section after a reasonable search
Water does not return after 30-45 minutes of gentle heat
You see a bulge, crack, or any moisture on the pipe
The freeze is inside a wall, ceiling, or slab you cannot access
You are dealing with a commercial property or a fire-suppression line
A plumber can thaw a line without opening a wall and pressure-test it afterward, the part most homeowners skip, and the part that catches a hairline crack before it becomes a ceiling repair.
Key Takeaway Thaw slowly, start at the faucet, match your heat source to the pipe material, and treat any change in flow or pressure as a signal to stop and inspect. A pipe that thaws without a leak is a good outcome; a pipe that thaws and then leaks is a much more expensive one.
PEX vs. Copper vs. PVC: How Pipe Material Changes the Risk
Pipe material changes how a freeze plays out, how you thaw it, and how likely you are to end up with a pipe burst instead of a simple blockage.
Material | Freeze Behavior | Where It Usually Fails | Safe Thaw Approach |
Copper (rigid) | Ice expands outward; the metal has almost no give | Splits along the wall of the pipe, often at a fitting or elbow | Slow, indirect heat only, hair dryer on low, heat tape rated for metal pipe |
PEX (cross-linked polyethylene) | Flexes with the ice and can survive a single freeze | Fittings, crimp rings, and manifolds fail before the tubing | Gentle heat; PEX tolerates freeze-thaw better but fittings do not |
PVC / CPVC (rigid plastic) | Becomes brittle in cold; ice expansion stresses joints | Cracks at solvent-welded joints and threaded adapters | Low, even heat; never direct flame or high-temp heat gun |
Galvanized steel (older homes) | Internal corrosion plus ice expansion | Pinhole leaks and seam splits, often hidden | Treat any freeze as a probable leak; inspect after thaw |
Why Copper Is the Highest-Risk Material
Copper has essentially no elastic range once ice forms inside it. Water expands roughly 9% by volume as it freezes, and rigid copper cannot absorb that, so the pipe typically splits lengthwise, a crack you may not see until the ice melts and water sprays.
PEX Survives More Often, But Not Always
PEX is the material most likely to survive a freeze without a split, because the tubing flexes as ice expands. But it isn't immune: the weak points are the mechanical connections, crimp rings, clamp fittings, and manifold ports. A PEX line that thaws without a leak can still have a compromised fitting that fails weeks later under normal pressure.
PVC and CPVC Crack at the Joints
Rigid plastic gets brittle as temperatures drop, and solvent-welded joints fail first. A PVC crack is often a clean split at a coupling or threaded adapter. Since PVC is common on drain lines and irrigation, a freeze may show up as a slow drip into a crawl space rather than a dramatic burst.
A Quick Material Check Before You Thaw
If you are not sure what you have, look at the pipe itself:
Copper is metallic, usually dull brown or green-tinged, and rigid.
PEX is plastic, often red, blue, or white, and bends easily by hand.
PVC is white or cream plastic and rigid; CPVC is usually cream or tan and rated for hot water.
Galvanized steel is gray metal, often with visible rust or mineral buildup at joints.
Watch Out Do not assume a thawed pipe is a safe pipe. Copper and PVC can hold a hairline crack that only leaks once full line pressure returns. After any freeze, leave a faucet open slightly and watch the exposed section for at least an hour before closing up a wall or ceiling.
Where Smart Sensors Fit In
A smart water sensor near the water heater, under a kitchen sink on an exterior wall, or in a basement near the main shut-off can catch the slow drip a material failure produces. Many units also report ambient temperature, alerting you when a pipe zone drops toward freezing, before ice forms.
When to Call a Professional Plumber
Call a licensed plumber when you can't find the frozen section, water won't return after thawing, or you see any sign of a leak, all point to damage beyond a simple freeze.
Also call if:
You have no water at all in the home
You spot a bulge or crack in the pipe
Water is pooling near a wall or ceiling
You're dealing with a commercial property
Preventing Frozen Pipes in Winter
Prevention beats repair. Insulate exposed pipes, seal gaps around exterior walls, and disconnect garden hoses before the first freeze.
Simple steps that work:
Add insulation sleeves to pipes in cold zones
Let a faucet drip during a winter storm
Keep cabinet doors open under sinks on outer walls
Keep the thermostat steady, day and night
Smart Home Leak Detection and Heat Tape
A smart leak sensor alerts your phone the moment it detects moisture. That early warning can save a ceiling. Pair it with heat tape on the pipes most likely to freeze.
Pro Tip Wrap heat tape in a spiral, not straight along the pipe, so the warmth spreads evenly. Overlapping heat tape can overheat and damage the pipe it's meant to protect.
Documenting Damage for Insurance Claims
If a pipe burst, document everything before you clean up: photos of the frozen section, the leak, and any water damage to walls, floors, or belongings.
Keep these records:
Photos and video of the damage
Receipts for any temporary repairs
A written timeline of when you noticed the problem
Notes from your plumber
Frequently Asked Questions
What are the early warning signs of frozen pipes?
The first clues are reduced water flow from one or two faucets, a trickle instead of a steady stream, and unusual plumbing noises like clanking, whistling, or banging when you turn on a tap. You may also notice frost on exposed pipe surfaces or a bulge in the pipe. Damp drywall and ceiling rings appear later, after a pipe has already cracked and begun to leak.
Will frozen pipes unfreeze on their own?
Sometimes, if the temperature rises above freezing for several hours, a lightly frozen pipe will thaw on its own. But pipes in exterior walls, crawl spaces, and unheated areas can stay frozen for days because those spaces stay cold even when the outdoor air warms. Leaving a frozen pipe untreated increases the risk of a pipe burst as pressure builds behind the ice blockage.
Can I use a hair dryer to thaw a frozen pipe?
Yes, a hair dryer is one of the safest tools for thawing frozen pipes. Start at the faucet end and work backward toward the frozen section, keeping the dryer moving. Never use an open flame, propane torch, or charcoal heater, which can crack the pipe or start a fire. If you cannot reach the frozen section or the pipe does not thaw within an hour, call a licensed plumber.
Why do pipes freeze in specific areas of the house?
Pipes freeze where cold air reaches them: exterior walls, unheated basements, crawl spaces, garages, attics, and along pipe joists near foundation vents. A sudden temperature drop combined with wind pushes cold air into these spaces. Pipes running through exterior walls with little insulation are the most vulnerable, especially when the main shut-off valve area is not protected.
Get In Touch


Comments